Showing posts with label tutorial. Show all posts

Wednesday, September 8, 2010

Snail Tutorial

Want to learn how to make a lampwork snail bead? It's easy! I'll show you in a few easy-to-follow steps.

First - and this is crucial - plan on making a regular ol' round bead. Add whatever decorations to it you'd like. I happen to be partial to murrini, so that's how I decorated mine. Once your bead is nicely decorated, melt it back into a nice, round bead. What's that? One side is messed up? Don't worry, it can be easily fixed. Just add a nice amount of a contrasting opaque color to the less-than-perfect side. Now we're making a turtle, so follow along. This opaque color will be the neck and head. If it's not doing what you want it to do, try to shape it with various tools. When that fails, get frustrated and smush the turtle head into the round bead, flattening one side of the formerly round bead. Keep the mess of a bead in the flame while you contemplate plunging the entire thing into a cup of cold water (after all, you wouldn't want it to crack before you have a chance to off it yourself). At this point you will come to the clear realization that this bead can be saved - it was supposed to be a snail all along. Add some more of that opaque color to one side for the head, and a bit to the backside for the tail. Re-flatten the bottom to make a nice slimy snail body. Add a couple googly eyes and voila! You have made a snail. Wasn't that easy?


Want to learn how to make a hippo bead now? Check out my super easy Hippo Tutorial.

Monday, November 2, 2009

Hippo Tutorial


Here's how to make a hippo bead, in several easy-to-follow steps.

First - and this part is critical - plan on making an elephant bead. Wind the pretty blue glass around the mandrel. Add a head. Then painstakingly add a trunk to the center of face. Keep on adding glass until the trunk is out of control. Then get fed up with the whole thing and pull part of the trunk off (don't worry, this does not hurt the elephant if you do it quickly). Next, realize that it just doesn't seem to be working out, so smash the remaining stump of trunk into the face. Melt that in and take a look. Then come to the obvious conclusion that this bead was meant to be a hippo. Add a couple eyes, some nostrils and some horn thingies on top. Then add some legs and a tail, and voila! It's a hippo. Easy as pie.

Any questions?

Tuesday, October 27, 2009

Penguins and Tutorial Talk

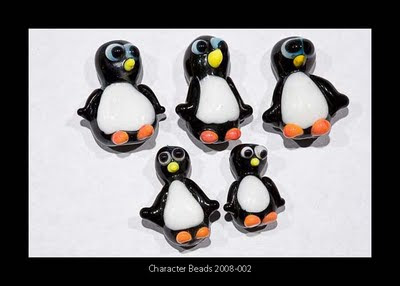
The first critter bead I made was a penguin. I had happened upon the Bead Envy website by Emma Green, and lo and behold - there was a lampwork penguin tutorial. I had not planned on making critter beads. My grand plan was to create beautiful, sophisticated beads for jewelry. But when I saw this tutorial for Plop the Penguin I knew I had to give it a try. Emma's tutorial is wonderful - it explains in full detail what to do and in what order - which is very important with sculptural beads. A penguin bead was bigger than anything I had made up until then, and at first I had some trouble keeping the entire bead hot. Sadly, some of my penguins lost a wing or two. But that first penguin I made, which resembled a penguin enough for my kids to recognize it, was all it took. I was hooked. I made penguin after penguin, with distorted heads and broken wings and eyeballs that melted together. But I didn't care - to me, they were the most fun I'd had at the torch yet. So I moved on to Emma's Cow Head Tutorial. The cow head was much trickier for me, but I kept at it. I was so grateful to have these steps outlined so beautifully and easily for me. My penguin and cow beads don't look like they used to, but they also don't look like Emma's. I took her instruction, and as they say on American Idol, "made it my own" - which is how it should be.

If you are a lampworker who would like to give critter beads a try, I highly recommend the tutorials on Bead Envy. If you are a collector of critter beads, I urge you to check out Emma's creations ~ they're just wonderful!

I would love to write a bead tutorial. I'm thinking about doing one for turtles, because I think those would be a good place to start for the aspiring critter bead artists (I know you're out there!). My turtle beads are basic, round beads with layered spots - just add the face, feet, toes and tail and voila! It's a turtle.

Here are a bunch of my original penguin beads - they now live in my daughters' bead boxes.

Penguin in a Pom Pom Hat - see how they've evolved? They even wear hats now!


I'd love to hear from lampworkers - do you use tutorials? Have you tried a critter bead tutorial? Would a turtle tutorial (a turtle toot) be something you'd be interested in?