Wednesday, September 29, 2010

Cartoon Inspiration

When I'm asked in blog interviews what inspires me, I know the artsy thing to say would be "nature, textures, the wind, poetry . . . etc." But aside from stuffed animals, I'm most inspired by cartoons. That's right. And I'm not alone.

I still haven't seen Despicable Me, but I've seen the funny little minion characters in the movie trailers. Those are definitely some bead-worthy dudes. Deirdre from anklebiterbeads thought so, too, and she made this little Minion bead, and several more.
Anyone who lives in a pineapple under the sea is definitely an inspiration to sculptural lampworkers. And this bead is by far a perfect tribute to Spongebob himself. Marcy of StudioMarcy made him as a special request for a child in a program called Bead Dreams, which is run through Beads of Courage. Children in the program are suffering serious illnesses, and can request special beads of exactly what they'd like. I'm betting this Spongebob bead (did I mention he glows in the dark?) made a little kid very happy. It makes me happy just looking at it.


I made this little guy after my kids got hooked on the Doodle Jump app. I've only played a few times (I stink), but once I saw the little Doodler I wanted to try to make him out of glass. I gave him an advantage by putting on his jet pack. Now he'll be able to zoom past those funny little monsters . . . hmm . . . those funny little monsters sure would make fun beads . . .


Friday, September 24, 2010

Random Pictures in My House

This is a Grow-A-Pirate. Just soak it in water and it grows! Arrrr. It was about an inch tall when we got it (a gift for my 14-year-old son - what every teenager wants these days, I know, we spoil him), and now it's filling out the glass. The bowl of water on top is for one of our kittens who kept drinking the pirate water (Ew!), so we put his water dish on top.

This is our 16-year-old cat, Buzz. He has found the warm, sunny spot on the carpet.

As you might know, I'm participating in an Art Charm swap. This is my little work area where I'm assembling my charms. The beads are face down to keep their identities a secret from other swap participants. As usual, there is an audience.

This is Ernie, keeping the bubble-wrap warm.

Monday, September 20, 2010

Murrini Monday

I'm having way too much fun with murrini.

This is Howard the elephant, a distant relative of Horton's. He isn't used to all this fanfare, but when he's got a murrini bloom in his trunk, he's sure to be featured on Murrini Monday.


Dilbert the turtle is showing off some really cool murrini that spreads out nicely on the bead and changes color a bit.

Snail shells are the perfect place to showcase murrini.


Dirty Guido the pirate pug didn't want to wear his dog collar, but I insisted. So he picked out a tough looking black and white murrini star. Now I won't have to worry if he runs away, as most pirate dogs eventually do.

Murrini for these beads is from Lori and Kim

Saturday, September 18, 2010

Art Charm Swap Progress - part II

As I said in my last Art Charm Swap update, I decided to change directions. Rather than making all of the same bead, I decided instead to vary them. I also wanted to use my new Celadon glass, which I think closely matches Lagoon, one of the color choices that is required for the charms. So each of my beads incorporates Celadon in some way. I had a lot of fun coming up with Celadon color combos. It looks really nice with intense blue, transparent purple, brown, silvered ivory . . . Ok, I'm giving too much away. Here is my latest progress picture, beads facing away from the camera again to hide their identities:

Next week I'll take a field trip to my favorite bead store and stock up on little sparklies to incorporate into my charms. I already have sterling silver headpins and a few fun loose beads, but I could use just a few more. I also might need jump rings. I don't know if these will be worn as jewelry, zipper pulls or some kind of decoration, so I want to make them as universally useful as possible. More next week!

Wednesday, September 15, 2010

ArtFire Comeback


I'm listing more beads in my ArtFire shop, so please be sure to stop in and take a look around. Some will be beads from my Etsy shop that have expired, so I'll mark them down. Some will be brand new beads. Either way, I plan on filling it up!

Raleigh the Rainbow Bellied Bird on ArtFire (this one has been marked down)

Monday, September 13, 2010

Murrini Monday

The snail beads I've recently started making (quite by accident) are the perfect way to show off murrini. I used the mini-sized murrini on the baby snail.

I'm always excited to see what Lori and Kim will think up next. I have practically no idea how they make their murrini, and I'm always amazed at the tiny details. I thought it would be fun to post some murrini ideas here.

I'll start - I think smiley faces and peace signs would be super cool to work with - what do you think?

Friday, September 10, 2010

Art Charm Swap Progress

The deadline for the Art Charm Swap I'm participating in is nearing (Oct. 1), and a couple of days ago I would have said I'm making decent progress. But in the past couple days I've started to rethink what I've made, and I just might head in another direction. Originally, I wanted to make a bunch of the same bead. There are ten of us in the swap, so I would make ten of the same bead. I realized pretty quickly that that's just now how I'm wired. That must be why I don't make sets or do large custom orders. Also, as you might recall from the rules, we have to use at least one of three colors - chocolate truffle, living coral and lagoon. For some reason, I was compelled to use all three. When I couldn't quite match the coral, I decided to stick with chocolate truffle and lagoon. But as I found making the same bead over and over to be a challenge, I also found using the same colors over and over became tedious. So . . . I think I may start all over. This is SO typical of me.

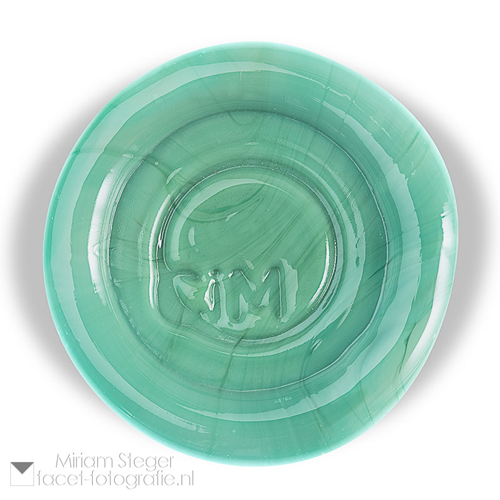
Let's back up just a bit. When I first signed on to do the Art Charm Swap, the biggest challenge was finding glass to match at least one of the colors required to be used in the charms. I knew my coral was too dark, so I tried to match lagoon. I think I'm pretty close with Celadon, an opaque sea foam green made by Creation is Messy. I do think I have a brown that is a decent match to the chocolate truffle color, but now that I may be starting over, I might just go with the pretty Celadon. I'd never used it before this and I am loving it! What do you think?


The glass color is slightly lighter than lagoon, but there are some sweet darker streaks in there.

And here's a sneak peek at what I had done so far, which could all be changed today when I get to the torch. I made the critters turn around so I wouldn't give it all away.


Wednesday, September 8, 2010

Snail Tutorial

Want to learn how to make a lampwork snail bead? It's easy! I'll show you in a few easy-to-follow steps.

First - and this is crucial - plan on making a regular ol' round bead. Add whatever decorations to it you'd like. I happen to be partial to murrini, so that's how I decorated mine. Once your bead is nicely decorated, melt it back into a nice, round bead. What's that? One side is messed up? Don't worry, it can be easily fixed. Just add a nice amount of a contrasting opaque color to the less-than-perfect side. Now we're making a turtle, so follow along. This opaque color will be the neck and head. If it's not doing what you want it to do, try to shape it with various tools. When that fails, get frustrated and smush the turtle head into the round bead, flattening one side of the formerly round bead. Keep the mess of a bead in the flame while you contemplate plunging the entire thing into a cup of cold water (after all, you wouldn't want it to crack before you have a chance to off it yourself). At this point you will come to the clear realization that this bead can be saved - it was supposed to be a snail all along. Add some more of that opaque color to one side for the head, and a bit to the backside for the tail. Re-flatten the bottom to make a nice slimy snail body. Add a couple googly eyes and voila! You have made a snail. Wasn't that easy?


Want to learn how to make a hippo bead now? Check out my super easy Hippo Tutorial.

Tuesday, September 7, 2010

Why Are These Beads Smiling?


Because they can! I've always used the side of a knife (on my wedding registry from 15 years ago - who knew?) for my turtle bead mouths. The result is an open mouth, with a somewhat happy and somewhat spaced out look. Think muppets. But I've been trying for a long time to get my beads to smile. I've seen some pretty sweet tools that are curved in just the right way to make a smile, but I haven't been able to get my hands on one. A lampworker friend suggested using the end of a potato peeler, but I couldn't find one that didn't have some kind of rubber near the area that would go into the hot bead. But I loved the idea of the potato peeler, and I started looking through my kitchen drawers for something I could shape into an arch. I finally had luck with a 1/2 teaspoon (who needs the half-size anyway?). I used my pliers and bent the handle into a smile. I was so excited that my turtles (the ones with mouths, anyway) would now be able to express their gratitude to me for creating them ~ with a smile.


Say Cheese!

It's a little harder to see the smile on a lapis blue alien. I'm learning which glass is happy glass.

I can't take all the credit for the smile on the turtle at the top of the page. It's so happy because its shell is covered with rainbow Smudges murrini by rosebud101.

Monday, September 6, 2010

Murrini Monday ~ it's Magically Delicious!

Last week my daughter was looking through my murrini, and she commented on how much I had collected. I know, I said, I won't be buying any for a while. I wanted to show her that I do know how to exercise restraint. But the very next day was Sept. 1, and something clicked and I remembered that new murrini would be up at Lori and Kim. I'll just check it out, I thought. I can look at it and admire it without having to own it. Right? Wrong. When I arrived at Lori and Kim's site I was greeted by Lucky Charms! I have never been known to turn down Lucky Charms! They're magically delicious! And so are the Lori and Kim murrini version. They were so magical that I went into a trance and when I came out of it, the Lucky Charms and Citrus Bloom were safely in my cart. I did show some restraint, however. I only bought one of each. :)

Lucky Charms ~ impossible to resist!


Here's the nifty little storage system for my murrini I picked up at JoAnne's. I didn't realize when I bought it that the containers are attached to each other, so you can't just take out one at a time. The top of one is the bottom of the one below it. It's not my favorite, but it's working for now. This is not all of my murrini. There is a bunch on my work table and more still in their little bags. I'm not the most organized person (that's an understatement), so this is pretty good for me.

Happy Murrini Monday to one and all!